

We present a practical guide that walks us through each step, from prep work to post‑heat checks. This intro sets clear expectations about tools, workspace, and the helper you should have on hand.
- Why vinyl wrap is the modern alternative to a paint job
- Essential tools and products for a pro-level car wrap
- Set up your workspace for success
- Surface prep: cleaning, decontamination, and inspection
- Measuring, planning panels, and cutting with extra material
- How to wrap a car: a step-by-step guide
- Using heat the right way: curves, contours, and bubble control
- Edges, seams, trimming, and post-heating for durability
- Aftercare: keeping your vinyl wrap looking fresh
- Conclusion
- FAQ
- What’s the quickest way for us to start a vinyl vehicle transformation?
- Why pick vinyl over repainting a vehicle?
- Which vinyl brands and materials do we recommend for pro-level results?
- Do we use a heat gun or a torch on vinyl, and which temperature is safe?
- What tools must be in our kit for a quality install?
- How do we prep the surface so adhesive bonds properly?
- What about dents, scratches, or imperfect paint beneath the film?
- How much extra material should we leave when cutting panels?
- How should we store vinyl rolls before installation?
- What technique do we use around curves and complex contours?
- How do we trim and finish edges without damaging paint?
- What post-heating steps improve long-term adhesion?
- How do we keep the finish looking new once installed?
- Can an amateur achieve pro-level results at home?
Our focus is on achieving a striking finish while protecting factory paint. We explain why a car wrap gives great visual impact and how it compares with resprays for long‑term upkeep.
We outline the full workflow at a glance: measuring, panel planning, application, seam care, and aftercare. We flag the biggest success factors: high quality vinyl, a dust‑free space, precise heat control, and disciplined sequencing.
Safety is first: blade control, heat awareness, and trim protection keep the job smooth. Expect realistic timeframes and actionable tips that mirror pro methods used by experienced wrappers.
Key Takeaways
- Follow a clear step‑by‑step plan for a pro result.
- Use high‑quality vinyl and work in a clean space.
- Protect paint and trim; practice blade and heat safety.
- Plan for the right tools, a helper, and realistic time.
- Vinyl offers flexible color changes with minimal permanence.
Why vinyl wrap is the modern alternative to a paint job
Modern film solutions give us fast, reversible color updates that compete with traditional paint.
High‑quality vinyl wrap often costs less than a mid‑range paint job. Typical paint work runs about $3,000–$10,000, while a full film job usually falls between $2,500–$5,000.
That price advantage comes with faster turnaround and less risk to original surfaces. A well‑installed film shields factory paint from UV, chips, and mild abrasions. This protection can help maintain resale value versus a non‑factory paint job.
Pros: cost, customization, protection
- Cost savings and quicker completion than many paint jobs.
- Finishes include matte, satin, gloss, metallic, and textured choices.
- Reversible upgrade—removable in a few years without permanent change.
“Vinyl is a precision film, not paint; it lets us try bold tones or subtle shifts without long‑term commitment.”
Monochrome fatigue: choosing new colors and finishes
More than half of vehicles leave the factory in neutral shades. That trend fuels demand for creative colors and specialty finishes.
| Option | Typical Cost | Lifespan |
|---|---|---|
| Full paint job | $3,000–$10,000 | Many years (permanent) |
| Full vinyl wrap | $2,500–$5,000 | 2–3 years (with care) |
| Partial accents or roof/hood | $300–$1,200 | 2–3 years (flexible) |
When we choose film, we emphasize quality materials and skilled installation. That combo gets results that rival a showroom finish and lets us refresh looks for seasonal campaigns or branding updates.
Essential tools and products for a pro-level car wrap
The right equipment makes the job faster, neater, and far less stressful.
Premium vinyl matters. We recommend 3M 1080 and Oracal because those films are forgiving, consistent, and durable. Choosing high quality reduces wasted time and rework.
Core kit we trust
Assemble all tools and products before you start. Include a felt and hard squeegee, sharp blade and spares, gloves, tape measure, tack cloths, knifeless tape, and lint‑free microfiber.
Heating and edge control
Manufacturers may call for a torch or a heat gun; always follow their guidance. When you use heat gun or torch, monitor panel temperature with an infrared thermometer for repeatable results.
3M Primer 94 goes only on edges and undersides to boost adhesive bite. Knifeless tape creates crisp cuts without risking paint.
“Premium film and the right kit let us focus on technique, not firefighting mistakes.”
Set an install section with everything in reach to keep momentum during application.
Set up your workspace for success
We begin with the shop. A tidy, climate‑stable shop is the unsung hero of every clean film job.
Indoor, dust‑free, moderate conditions
We choose an indoor place with clean floors and bright lights. This keeps the surface visible and dust‑free while we move around the car.
Target a steady temperature so the vinyl behaves predictably and the adhesive performs well. Avoid direct sun and wind.
Storing rolls and staging panels
Keep vinyl rolls vertical, away from heaters and sunlight. That prevents flat spots and edge damage.
Set tables or racks with liner‑down staging. This cuts exposure and reduces contamination during each panel install.
- Ensure enough area to walk around the vehicle and stage tools.
- Plan power access for heat tools and route cords safely.
- Schedule blocks of time to finish panels without interruptions.
“Good setup saves hours and reduces finish issues.”
| Setup Item | Why it matters | Quick tip |
|---|---|---|
| Clean, indoor place | Reduces dust and contamination | Sweep, then tack with microfiber |
| Stable temperature | Consistent film handling | Use heater or AC if needed |
| Vertical storage | Prevents roll damage | Keep off concrete and out of sun |
Surface prep: cleaning, decontamination, and inspection
A spotless surface is the single biggest determinant of a long‑lasting finish. We begin with a full degrease to remove wax, silicone, and road film that will block adhesive contact.
After degreasing, we follow with a precise 10–15% rubbing alcohol mixed into 85–90% water for the final wipe. Use fresh, lint‑free microfiber and keep cloths separate for each pass to avoid cross‑contamination.
Clean edges, door jamb lips, and underside returns thoroughly. These are the areas where Primer 94 and the adhesive must anchor. Mask porous trim or badges we cannot remove to stop residue transfer.
We glove up and run gloved fingertips over each panel to find tiny defects. Any dents, chips, or raised scratches will telegraph through vinyl just like paint would. Mark those spots and handle minor body repairs before film goes on.
Keep dusting between steps and finish with a tack cloth just before laying film. Patience here builds strong bonds and reduces problems later.
“Meticulous prep means the film sticks where it should and stays looking sharp.”
Measuring, planning panels, and cutting with extra material
Accurate measuring and smart panel planning save us hours and cut waste on every install. We map the vehicle into logical sections, starting with the hood, then fenders and sides, and record each dimension carefully.

Measure each panel separately and add about 3 inches of bleed on all sides for tensioning and tucking. For complex rear fenders allow roughly 12 inches because curves eat material.
Plan the fewest seams possible and align any joins with body lines or shadowed channels. This is the clearest way to hide seams and keep sightlines clean on the car.
Cut liner-down on a clean table using a sharp blade. Mark pieces with a dry-erase marker and label each part by location and orientation.
Bag or place labeled pieces inside the cabin to protect them from dust. Expect to order extra vinyl — mistakes and offcuts are normal, and surplus saves time and stress.
- Verify measurements twice before cutting.
- Previsualize tricky corners and set your start line.
- Stage panels in install order to keep momentum and reduce handling.
“Plan panels carefully and protect pieces; careful prep makes installation the easiest part.”
How to wrap a car: a step-by-step guide
We start on broad, flat panels so our technique and timing come together before tackling curves.
Begin with the hood and roof. These areas teach how vinyl moves and how much tension the material accepts. Work with a helper on large pieces to hold alignment and manage slack.
Center-out application
Peel backing in stages and set the center first. Use the squeegee from the middle outward with overlapping passes to push out air and avoid tracks.
Managing wrinkles and alignment
Keep hands clean and dry before handling film. If a wrinkle or bubble appears, lift gently, add slight heat, and reset. Adhesive bonds when pressed; steady pressure seals edges.
- Maintain even overhang for later tucking.
- Swap to the felt edge on visible faces to prevent marring.
- Recheck fit near handles, fuel doors, and holes before final set.
“Start simple, build skill, and the next panels go faster and cleaner.”
| Step | Key action | Why it matters |
|---|---|---|
| Start panel | Hood or roof with helper | Learn tension control on flat areas |
| Backing removal | Center first, staged peel | Prevents misalignment and reduces air pockets |
| Squeegee work | Center-out, overlapping strokes | Evacuates air and creates consistent bond |
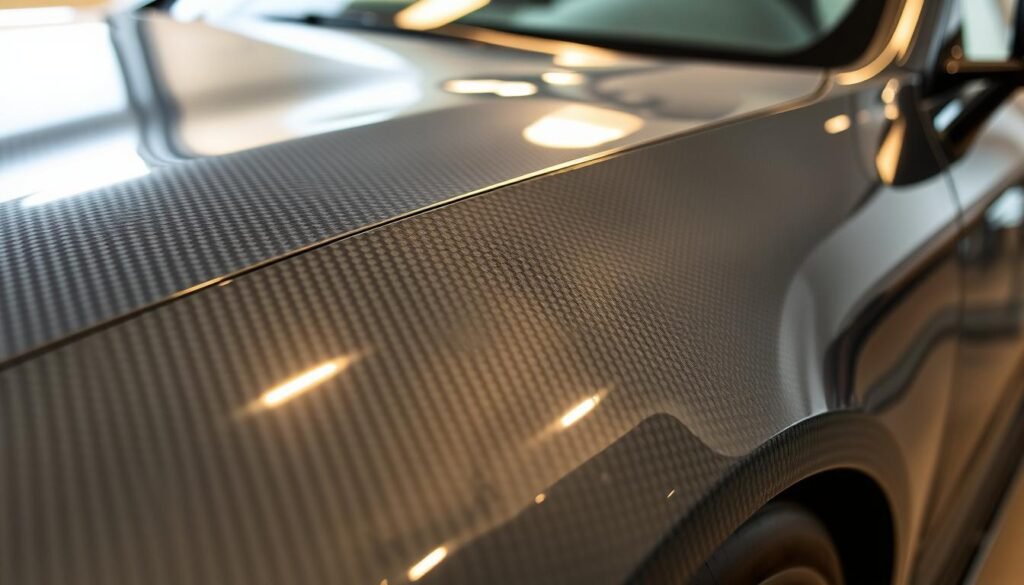
Using heat the right way: curves, contours, and bubble control
Gentle, targeted warmth is what helps film lie cleanly over complex shapes. We use heat to relax the vinyl so it follows crowns and recesses without tearing the surface or thinning the material.
Relaxing curves and removing crow’s feet
Apply heat in short bursts on tight curves. As the film warms, folds shrink into small “crow’s feet” that we can ease out by lifting slightly and re‑laying the panel.
Squeegee angle and small-section work
Keep the squeegee at roughly a 45‑degree angle. We work from the center outward in small arcs so the vinyl stretches evenly across the car’s crown.
When to lift, reheat, and reset
If you spot bubbles or a stuck overlap, pause. Gently lift, use a heat gun at safe distance, and re‑position. Test a scrap to learn the film’s heat window and recovery time.
- Pre‑warm tight channels so the vinyl flows, not bunches.
- Keep steady hand tension to avoid warping near corners.
- Avoid trapping heat against trim or rubber; protect edges.
“Short, controlled heat bursts and small corrections save more time than major panel reworks.”
Edges, seams, trimming, and post-heating for durability
Small details at panel edges make the biggest difference in long-term adhesion.
We apply 3M Primer 94 only on edges and underside returns. That targeted use helps the adhesive bite where lift often starts. Aim for about 1 cm of underside overlap on each panel so the film locks under trim and returns.
For seams, we rely on knifeless tape and overlap joins. Overlapped seams stay invisible and stable; butt seams can shrink and reveal gaps. Trim methodically and work panel by panel so excess material stays available for neat tucks.
Cut with a sharp blade, always cutting away from paint. Leave enough film for tucking before final trimming. Keep tools and products handy so critical steps aren’t rushed.
Post‑heat stretched areas to roughly 200–250°F (93–121°C) and hold long enough for the adhesive to activate. Use an air‑release pen for any late bubbles, then re‑warm briefly and press flat. Let the film settle for a day — that dwell period helps edges resist lift over time.
“Focus on clean edges and controlled heat; small steps like Primer 94 and knifeless tape pay off in durability.”
Aftercare: keeping your vinyl wrap looking fresh
A light, careful cleaning routine is the single best habit for long‑term results. With modest care we protect color and extend the finish for many years. Our goal is simple: gentle handling, quick spot action, and routine inspection.
Hand wash only. We use mild detergent, soft microfiber, and the two‑bucket method. One bucket holds soapy water and the other clean water for rinsing. This reduces grit and swirl marks while keeping the film happy.
Avoid these common risks
We skip jet washes and abrasive brushes. Oil‑based products and waxes can soften edges and weaken adhesive bonds. Park in shade when possible to limit UV and heat stress on the wrap.
Spot cleaning kit
- Keep a spray bottle with a 10–15% alcohol mixture and a lint‑free cloth for spills.
- Rinse dirty areas with clean water between passes and dry gently with soft towels.
- Check high‑impact areas like rocker panels often and carry small tools and products for quick fixes.
“Routine, gentle care prevents small problems from becoming expensive repairs.”
Conclusion
This final section gathers the key steps that make a vinyl wrap last and look pro. We recap the full guide so you can plan each job with confidence and steady timing.
Start with premium vinyl, spotless panels, and precise measuring. Use the center‑out squeegee technique, remove trapped air early, and place seams along body lines with knifeless tape.
Protect the hood and large flats first, treat edges with Primer 94, then post‑heat stretched areas (200–250°F) using a heat gun and thermometer to activate the adhesive.
Aftercare makes finishes last for years: hand wash with the two‑bucket method, dry gently, and spot clean with an alcohol mix. Work methodically, stage panels and tools, and revisit key steps before your next project.
,
FAQ
What’s the quickest way for us to start a vinyl vehicle transformation?
We begin by choosing a flat panel like the hood or roof. That builds confidence and teaches center-out application, controlled backing removal, and overlap squeegee strokes. We always measure each panel, add bleed, and label pieces before cutting liner-down to avoid contamination.
Why pick vinyl over repainting a vehicle?
Vinyl offers lower upfront cost, faster turnaround, and near-instant customization with finishes like matte, gloss, satin, or metallic. It also protects factory paint from minor chips and UV and can be removed later without the permanent changes a paint job creates.
Which vinyl brands and materials do we recommend for pro-level results?
We use premium films such as 3M 1080 and ORACAL 970 for durability and consistent adhesive. Quality matters: higher-grade vinyl stretches more predictably, resists fading, and reduces telegraphing of underlying imperfections.
Do we use a heat gun or a torch on vinyl, and which temperature is safe?
We use an electric heat gun, not an open flame, and aim for post-heat between 200–250°F (93–121°C) to activate adhesive and set edges. An infrared thermometer helps maintain safe, even temperatures. Manufacturers recommend avoiding direct torching unless you’re using specialized tools and training.
What tools must be in our kit for a quality install?
Our must-haves: felt and hard squeegees, sharp blades, nitrile gloves, measuring tape, tack cloths, knifeless tape, 3M Primer 94, a heat gun, and an infrared thermometer. These tools keep seams clean and edges bonded for lasting results.
How do we prep the surface so adhesive bonds properly?
We decontaminate with a degreaser, then wipe with a 10–15% isopropyl alcohol mix diluted in water for the final clean. We focus on edges, undersides, and fastener areas so the adhesive makes full contact where it matters.
What about dents, scratches, or imperfect paint beneath the film?
We inspect and address bodywork first. Flaws will telegraph through vinyl over time, so small dents or deep scratches should be repaired or at least smoothed before applying film.
How much extra material should we leave when cutting panels?
We add about 3 inches (7–8 cm) of bleed for most panels and more on complex areas like rear fenders. Extra material gives room for heat-shrink, tucking, and safe blade cuts without risking gaps.
How should we store vinyl rolls before installation?
Store rolls vertically in a cool, dry place away from direct sunlight and heat. Keeping them upright reduces edge deformation and preserves the adhesive and face film for years when stored correctly.
What technique do we use around curves and complex contours?
We apply heat to relax the film, work from the center outward, and maintain about a 45-degree squeegee angle. For tight curves, we heat, stretch gently, and avoid overworking one spot. When wrinkles appear, we lift, reheat, and re-seat the material.
How do we trim and finish edges without damaging paint?
We use knifeless tape for sealed seams and 3M Primer 94 on underneath edges for added adhesion. When we must blade, we cut away from paint and leave enough excess to tuck. Safety and steady cuts prevent accidental paint nicks.
What post-heating steps improve long-term adhesion?
After trimming, we post-heat at the recommended range to activate the adhesive and allow a short dwell time so bonds cure. This step reduces edge lift and helps the wrap conform to contours permanently.
How do we keep the finish looking new once installed?
We hand wash only with mild detergent, use microfiber cloths, and employ the two-bucket method. We avoid pressure washers, oil-based polishes, and prolonged sun exposure. For spot issues, an alcohol-water spray and lint-free cloth work well.
Can an amateur achieve pro-level results at home?
With patience, proper tools, and premium material, we can get excellent results on flat panels. Complex curves, seams, and full-vehicle installs usually benefit from professional experience to avoid telegraphing and ensure long-term durability.


